Unity UI System
Unity dùng hệ thống uGUI (Unity GUI) để tạo giao diện. Mọi UI element đều nằm trong một Canvas.
Canvas — Nền tảng cho UI
Tạo UI element đầu tiên → Unity tự tạo Canvas. Hoặc: Hierarchy > UI > Canvas.
Render Mode
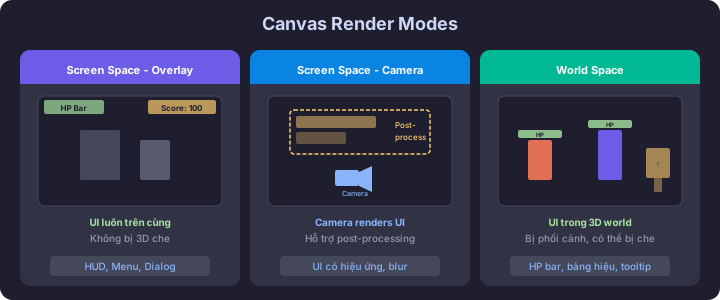
| Mode | Mô tả | Use case |
|---|---|---|
| Screen Space - Overlay | UI luôn trên cùng, không bị 3D che | HUD, menu |
| Screen Space - Camera | UI render bởi camera, có thể bị post-processing | UI có hiệu ứng |
| World Space | UI tồn tại trong 3D world | Health bar trên đầu enemy, bảng hiệu |
Mặc định dùng Screen Space - Overlay cho HUD.
Canvas Scaler
Component quan trọng trên Canvas — quyết định UI scale trên các màn hình khác nhau.
Recommended setup:
- UI Scale Mode: Scale With Screen Size
- Reference Resolution: 1920 x 1080
- Match Width Or Height: 0.5
RectTransform — Transform cho UI
UI elements dùng RectTransform thay vì Transform. Nó có thêm:
- Anchors — Điểm neo vào Canvas (quan trọng nhất!)
- Pivot — Điểm gốc của element
- Width / Height — Kích thước
Anchors — Responsive UI
Anchors quyết định element bám vào đâu khi màn hình thay đổi kích thước.
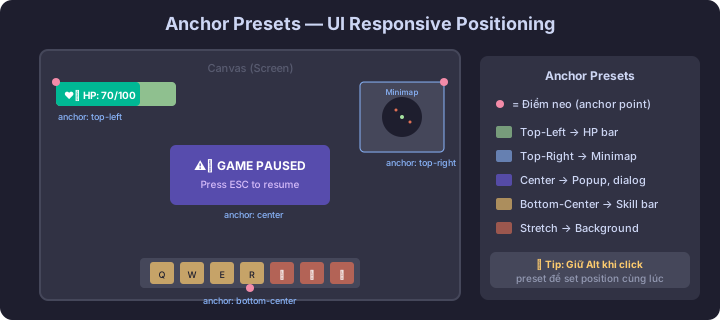
| Anchor preset | Vị trí | Ví dụ |
|---|---|---|
| Top-Left | Góc trên trái | HP bar |
| Top-Right | Góc trên phải | Minimap |
| Bottom-Center | Giữa dưới | Action bar |
| Stretch-Stretch | Full screen | Background |
| Center | Giữa màn hình | Popup, dialog |
Tip: Giữ Alt khi click anchor preset để đồng thời set position.
UI Components
Text (TextMeshPro)
Luôn dùng TextMeshPro thay vì Text cũ — chất lượng render tốt hơn nhiều.
using TMPro;

public class ScoreUI : MonoBehaviour
{
    [SerializeField] private TextMeshProUGUI scoreText;
    private int score = 0;

    public void AddScore(int points)
    {
        score += points;
        scoreText.text = $"Score: {score}";
    }

    public void UpdateTimer(float timeLeft)
    {
        int minutes = (int)(timeLeft / 60);
        int seconds = (int)(timeLeft % 60);
        scoreText.text = $"{minutes:00}:{seconds:00}";
    }
}
Tạo: UI > Text - TextMeshPro. Lần đầu sẽ hỏi import TMP Essentials — nhấn Import.
Image
using UnityEngine.UI;

public class HealthBar : MonoBehaviour
{
    [SerializeField] private Image fillImage;
    [SerializeField] private Color fullColor = Color.green;
    [SerializeField] private Color lowColor = Color.red;

    public void UpdateHealth(float normalizedHealth)  // 0.0 → 1.0
    {
        fillImage.fillAmount = normalizedHealth;
        fillImage.color = Color.Lerp(lowColor, fullColor, normalizedHealth);
    }
}
Setup Health Bar:
- Tạo UI > Image (background, màu xám)
- Child: UI > Image (fill, màu xanh)
- Fill Image: Image Type = Filled, Fill Method = Horizontal
Button
using UnityEngine;
using UnityEngine.UI;

public class MenuController : MonoBehaviour
{
    [SerializeField] private Button startButton;
    [SerializeField] private Button quitButton;

    void Start()
    {
        // Cách 1: gán trong code
        startButton.onClick.AddListener(OnStartClicked);
        quitButton.onClick.AddListener(OnQuitClicked);
    }

    void OnStartClicked()
    {
        Debug.Log("Start Game!");
        SceneManager.LoadScene("Level_01");
    }

    void OnQuitClicked()
    {
        Debug.Log("Quit!");
        Application.Quit();
    }

    void OnDestroy()
    {
        // Cleanup listeners
        startButton.onClick.RemoveListener(OnStartClicked);
        quitButton.onClick.RemoveListener(OnQuitClicked);
    }
}
Cách 2 (phổ biến hơn): Gán trực tiếp trong Inspector qua Button component → OnClick() → kéo object + chọn method.
Slider
public class VolumeControl : MonoBehaviour
{
    [SerializeField] private Slider volumeSlider;
    [SerializeField] private TextMeshProUGUI volumeText;

    void Start()
    {
        volumeSlider.onValueChanged.AddListener(OnVolumeChanged);
        volumeSlider.value = 0.8f;  // default 80%
    }

    void OnVolumeChanged(float value)
    {
        AudioListener.volume = value;
        volumeText.text = $"Volume: {(int)(value * 100)}%";
    }
}
Layout Groups — Tự động sắp xếp
Thay vì đặt vị trí thủ công cho từng element, dùng Layout Groups.
Vertical Layout Group
Xếp children từ trên xuống (danh sách, menu).
Panel (Vertical Layout Group)
├── Button "New Game"
├── Button "Load Game"
├── Button "Settings"
└── Button "Quit"
Properties:
- Spacing — khoảng cách giữa elements
- Padding — margin bên trong
- Child Alignment — căn giữa, trái, phải
Horizontal Layout Group
Xếp children từ trái sang phải (inventory bar, skill bar).
Grid Layout Group
Xếp theo lưới (inventory grid, level select).
Panel (Grid Layout Group)
├── Item Slot 1   Item Slot 2   Item Slot 3
├── Item Slot 4   Item Slot 5   Item Slot 6
└── Item Slot 7   Item Slot 8   Item Slot 9
Properties:
- Cell Size — kích thước mỗi ô
- Spacing — khoảng cách giữa ô
- Constraint — Fixed Column Count hoặc Fixed Row Count
Content Size Fitter
Tự resize element theo nội dung (text dài hơn → box to hơn).
SceneManager — Chuyển Scene
using UnityEngine.SceneManagement;

public class SceneController : MonoBehaviour
{
    public void LoadScene(string sceneName)
    {
        SceneManager.LoadScene(sceneName);
    }

    public void RestartCurrentScene()
    {
        SceneManager.LoadScene(SceneManager.GetActiveScene().buildIndex);
    }

    public void NextLevel()
    {
        int currentIndex = SceneManager.GetActiveScene().buildIndex;
        SceneManager.LoadScene(currentIndex + 1);
    }

    public void QuitGame()
    {
        Application.Quit();
        // Trong Editor, Quit không hoạt động
        #if UNITY_EDITOR
        UnityEditor.EditorApplication.isPlaying = false;
        #endif
    }
}
Nhớ: Thêm scenes vào File > Build Settings > Scenes In Build.
Ví Dụ Tổng Hợp: Complete HUD
using UnityEngine;
using UnityEngine.UI;
using TMPro;

public class GameHUD : MonoBehaviour
{
    [Header("Health")]
    [SerializeField] private Image healthFill;
    [SerializeField] private TextMeshProUGUI healthText;

    [Header("Score")]
    [SerializeField] private TextMeshProUGUI scoreText;

    [Header("Timer")]
    [SerializeField] private TextMeshProUGUI timerText;

    [Header("Game Over")]
    [SerializeField] private GameObject gameOverPanel;
    [SerializeField] private TextMeshProUGUI finalScoreText;
    [SerializeField] private Button restartButton;
    [SerializeField] private Button menuButton;

    private int score;
    private float gameTime;
    private bool isGameOver;

    void Start()
    {
        gameOverPanel.SetActive(false);
        score = 0;
        gameTime = 120f;  // 2 phút

        restartButton.onClick.AddListener(() =>
            UnityEngine.SceneManagement.SceneManager.LoadScene(
                UnityEngine.SceneManagement.SceneManager.GetActiveScene().buildIndex));

        menuButton.onClick.AddListener(() =>
            UnityEngine.SceneManagement.SceneManager.LoadScene("MainMenu"));
    }

    void Update()
    {
        if (isGameOver) return;

        // Timer countdown
        gameTime -= Time.deltaTime;
        if (gameTime <= 0)
        {
            gameTime = 0;
            GameOver();
        }

        UpdateTimerDisplay();
    }

    public void UpdateHealth(int current, int max)
    {
        float normalized = (float)current / max;
        healthFill.fillAmount = normalized;
        healthFill.color = Color.Lerp(Color.red, Color.green, normalized);
        healthText.text = $"{current}/{max}";

        if (current <= 0) GameOver();
    }

    public void AddScore(int points)
    {
        score += points;
        scoreText.text = $"Score: {score}";
    }

    void UpdateTimerDisplay()
    {
        int min = (int)(gameTime / 60);
        int sec = (int)(gameTime % 60);
        timerText.text = $"{min:00}:{sec:00}";

        // Flash đỏ khi còn ít thời gian
        timerText.color = gameTime <= 10 ? Color.red : Color.white;
    }

    void GameOver()
    {
        isGameOver = true;
        gameOverPanel.SetActive(true);
        finalScoreText.text = $"Final Score: {score}";
        Time.timeScale = 0f;  // pause game
    }
}
Setup trong Editor
Canvas (Screen Space - Overlay)
├── HealthBar (top-left)
│   ├── Background (Image, xám)
│   └── Fill (Image, Filled, xanh → đỏ)
├── ScoreText (top-right, anchor top-right)
├── TimerText (top-center)
└── GameOverPanel (center, default inactive)
    ├── Background (semi-transparent black)
    ├── "GAME OVER" Text
    ├── FinalScore Text
    ├── Restart Button
    └── Menu Button
Bài Tập
Bài 1: Main Menu Tạo scene Main Menu với: Title text, 3 buttons (Start, Settings, Quit). Dùng Vertical Layout Group. Button Start load scene "Game", Quit thoát app.
Bài 2: Inventory Grid Tạo inventory panel 4x4 dùng Grid Layout Group. Mỗi slot là button với Image. Click slot → highlight (đổi màu). Hiển thị tên item selected ở text bên dưới.
Bài 3: Damage Numbers Khi enemy nhận damage, spawn Text UI tại vị trí enemy (World Space Canvas). Text bay lên và fade out trong 1 giây rồi Destroy. Dùng Coroutine hoặc Update.
Bài trước: Unity #3: Physics Bài tiếp: Unity #5: Design Patterns — Singleton, Observer & Object Pool