
Trước khi bắt đầu
Bài này giả định bạn đã cài đặt Unity Hub và Unity Editor. Nếu chưa, xem bài Hướng Dẫn Cài Unity trước.
Bạn cũng nên đã hoàn thành series C# Cho Game Dev để nắm vững C# cơ bản.
Series Unity gồm 5 bài:
- GameObject, Component & Scene ← Bạn đang ở đây
- Scripting: MonoBehaviour & Input
- Physics: Rigidbody, Collider & Raycast
- UI: Canvas, Layout & Event System
- Design Patterns: Singleton, Observer & Object Pool
Unity Editor — Cái nhìn tổng quan
Khi mở Unity lần đầu, bạn sẽ thấy 5 panel chính:
- Hierarchy (trái) — Danh sách tất cả GameObjects trong scene hiện tại
- Scene View (giữa) — Viewport 3D/2D để di chuyển, xoay, scale objects
- Game View (tab cùng Scene) — Preview game khi nhấn Play
- Inspector (phải) — Chi tiết components của object được chọn
- Project (dưới) — File browser cho tất cả assets: scripts, textures, prefabs, scenes
Tip: Nếu lỡ mất panel nào, vào Window > Layouts > Default để reset.
GameObject — Mọi thứ đều là GameObject
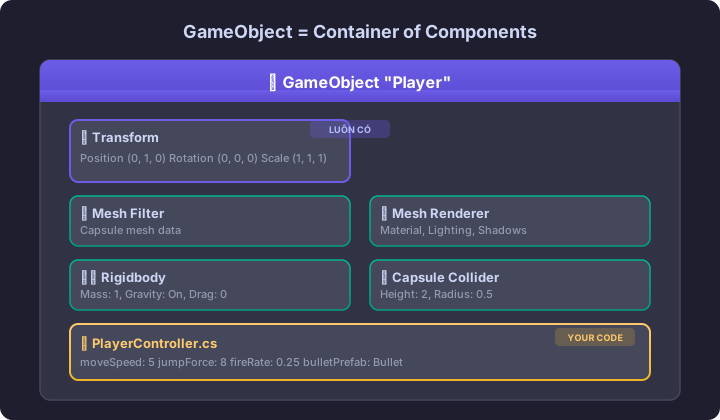
Trong Unity, mọi thứ trong scene đều là GameObject: camera, ánh sáng, nhân vật, cây cối, UI button, thậm chí cả empty object dùng làm container.
Một GameObject tự nó không làm gì cả. Nó chỉ là container chứa Components. Components mới là thứ tạo ra hành vi.
Tạo GameObject
- Hierarchy > Chuột phải > 3D Object > Cube — tạo khối hộp
- Hierarchy > Chuột phải > Create Empty — tạo object rỗng
- Hierarchy > Chuột phải > Light > Point Light — tạo nguồn sáng
GameObject = Container of Components
GameObject "Player"
├── Transform          (vị trí, xoay, scale — LUÔN có)
├── Mesh Filter        (hình dạng 3D)
├── Mesh Renderer      (hiển thị hình dạng)
├── Box Collider       (va chạm vật lý)
├── Rigidbody          (trọng lực, lực)
└── PlayerController   (script C# của bạn)
Muốn object có trọng lực? Thêm Rigidbody. Muốn va chạm? Thêm Collider. Muốn logic riêng? Thêm Script. Đây gọi là Component-Based Architecture.
Transform — Component quan trọng nhất
Mọi GameObject luôn có Transform. Nó xác định:
- Position — Vị trí trong không gian (x, y, z)
- Rotation — Góc xoay (x, y, z) tính bằng độ
- Scale — Kích thước (x, y, z), mặc định (1, 1, 1)
Trong Inspector
Bạn có thể chỉnh trực tiếp giá trị Position/Rotation/Scale trong Inspector. Hoặc dùng các tool trên toolbar:
- W — Move tool (di chuyển)
- E — Rotate tool (xoay)
- R — Scale tool (phóng to/thu nhỏ)
- T — Rect tool (cho UI)
Trong Code (preview)
// Di chuyển object đến vị trí (5, 0, 3)
transform.position = new Vector3(5f, 0f, 3f);

// Xoay 90 độ quanh trục Y
transform.rotation = Quaternion.Euler(0f, 90f, 0f);

// Scale gấp đôi
transform.localScale = new Vector3(2f, 2f, 2f);
Chi tiết hơn ở bài scripting.
Hierarchy — Quan hệ Cha-Con
GameObjects có thể được sắp xếp theo parent-child hierarchy. Kéo thả object A vào object B trong Hierarchy → A trở thành con của B.
Ý nghĩa Parent-Child
- Di chuyển parent → tất cả children di chuyển theo
- Xoay parent → children xoay quanh parent
- Scale parent → children scale theo
Ví dụ thực tế
Tank (parent)
├── Body (mesh)
├── Turret (child — xoay độc lập)
│   └── Barrel (child of Turret)
│       └── MuzzleFlash (particle effect)
└── Wheels (child — quay khi di chuyển)
Di chuyển Tank → toàn bộ di chuyển. Xoay Turret → chỉ Turret + Barrel + MuzzleFlash xoay.
Tổ chức Scene sạch sẽ
Dùng Empty GameObjects làm folder:
--- (Hierarchy) ---
Environment
├── Ground
├── Trees
├── Rocks
Enemies
├── Goblin_01
├── Goblin_02
├── Dragon_Boss
Player
├── PlayerModel
├── Camera
UI
├── HealthBar
├── ScoreText
Managers
├── GameManager
├── AudioManager
Đặt tên rõ ràng, nhóm logic → dễ tìm, dễ quản lý.
Components Phổ Biến
Rendering
| Component | Chức năng |
|---|---|
| Mesh Filter | Chứa dữ liệu mesh (hình dạng 3D) |
| Mesh Renderer | Hiển thị mesh với material |
| Sprite Renderer | Hiển thị sprite 2D |
| Camera | Viewport nhìn vào game world |
| Light | Nguồn sáng (Directional, Point, Spot) |
Physics
| Component | Chức năng |
|---|---|
| Rigidbody | Cho phép physics engine kiểm soát (trọng lực, lực) |
| Box/Sphere/Capsule Collider | Vùng va chạm |
| Character Controller | Di chuyển character có va chạm (không dùng Rigidbody) |
Audio
| Component | Chức năng |
|---|---|
| Audio Source | Phát âm thanh |
| Audio Listener | "Tai" nghe âm thanh (thường trên Camera) |
Thêm Component
Chọn GameObject → Inspector → Add Component → tìm tên component.
Hoặc trong code:
gameObject.AddComponent<Rigidbody>();
Prefab — Bản thiết kế tái sử dụng
Prefab là GameObject được lưu thành asset. Bạn tạo 1 enemy prefab, rồi dùng nó để spawn 100 enemies — tất cả đều giống nhau. Sửa prefab → tất cả instances cập nhật.
Tạo Prefab
- Tạo GameObject trong Hierarchy, thêm đủ components
- Kéo thả từ Hierarchy vào Project window
- Xong! Icon xanh = Prefab
Sử dụng Prefab
- Kéo Prefab từ Project vào Scene → tạo instance
- Hoặc spawn bằng code:
Instantiate(prefab, position, rotation) - Sửa Prefab: double-click để vào Prefab Mode
Prefab Variants
Tạo biến thể từ Prefab gốc. Ví dụ:
- Enemy_Base (prefab gốc): HP 50, Speed 3
- Enemy_Fast (variant): Speed 6, còn lại giữ nguyên
- Enemy_Tank (variant): HP 150, Speed 1
Scene — Cấp độ lớn nhất
Scene là "level" trong Unity. Mỗi scene chứa các GameObjects riêng.
Tổ chức Scenes
Scenes/
├── MainMenu.unity
├── Level_01.unity
├── Level_02.unity
├── BossArena.unity
└── GameOver.unity
Chuyển Scene (preview code)
using UnityEngine.SceneManagement;

SceneManager.LoadScene("Level_01");      // theo tên
SceneManager.LoadScene(1);               // theo build index
Nhớ thêm scenes vào File > Build Settings để hoạt động.
Workflow Thực Tế: Tạo Scene Đầu Tiên
Bước 1: Tạo project mới → 3D (Core)
Bước 2: Tổ chức Hierarchy
- Tạo Empty → đặt tên "Environment"
- Tạo Empty → đặt tên "Player"
Bước 3: Tạo ground
- Chuột phải Hierarchy → 3D Object → Plane
- Kéo vào "Environment"
- Scale: (5, 1, 5) — ground 50x50 units
Bước 4: Tạo player
- 3D Object → Capsule
- Kéo vào "Player"
- Position: (0, 1, 0) — đứng trên ground
Bước 5: Thêm ánh sáng
- Directional Light đã có sẵn (mặt trời)
- Thêm Point Light gần player nếu muốn
Bước 6: Chỉnh camera
- Chọn Main Camera
- Position: (0, 5, -8), Rotation: (30, 0, 0)
- Nhấn Play → xem kết quả
Bạn vừa tạo scene đầu tiên! Bài tiếp theo sẽ thêm script C# để player di chuyển được.
Bài Tập
Bài 1: Simple Environment Tạo scene với ground (Plane), 5 "cây" (Cylinder + Sphere ở trên), 3 "đá" (Sphere scale nhỏ). Tổ chức trong Hierarchy sạch sẽ.
Bài 2: Obstacle Course Tạo đường đua chướng ngại vật: ground dài, nhiều Cube làm rào cản, Capsule làm player. Thêm các material màu khác nhau (Assets > Create > Material).
Bài 3: Prefab Practice Tạo 1 "Enemy" prefab (Cube đỏ + Sphere nhỏ = "mắt"). Đặt 5 instances trong scene ở các vị trí khác nhau. Vào Prefab Mode, thêm 1 component mới → xác nhận tất cả instances đều cập nhật.